Get started with Polymer 1.0 and Sublime Text 3.0
Development of Polymer using Sublime
In a previous post I have explained how to get started with Polymer 1.0 and Webstorm 11. Unfortunately WebStorm is a paid product and not all of my followers can purchase a license (me neither, I am trying to see if JetBrains will grant me a teacher license for free).
So, I decided to create a new tutorial which explains how to get started with Polymer 1.0 using Sublime Text, a power and free text editor also used by Google Polymer’s Team. In this tutorial I will use more tools than in the previous one because SublimeText is just a text editor (powerful but still a text editor), so in order to run your app you also need an integrated web server like GULP and other tools.
Download the necessary tools
First of all, in order to have the proper environment setup correctly, especially in Windows, you MUST download all tools before you start to download SublimeText or Polymer, otherwise you will start the nightmare of “path not found” errors and similar.
- GIT
GIT is a well-known command tool for managing GIT repositories. Even if you come from an SVN or TFS (Team Foundation Server) environment I would suggest you to get started on GIT because even companies like Microsoft are moving their source code into GitHub or BitBucket repositories and GIT is used by BOWER to download and synchronize components from Polymer. https://git-scm.com/
- NODE.js
Node is a JavaScript runtime build on Chrome V8 JavaScript engine. If you work with Polymer your primary use of Node is with the command NPM, which will be used in parallel with BOWER. https://nodejs.org/en/
- BOWER
If you come from Java you may be aware of “Maven Central” while if you come from .NET you may be aware of “Nuget”. Well BOWER is the same concept applied to web development. It allows you to download “packages” of CSS, JavaScript and HTML files packed as “components”. Without Node.js you can’t use BOWER because it requires the NPM (Node Package Manager) command tool. http://bower.io/
So at this point you have your core tools registered and working correctly. Now it’s time to download SublimeText 3.0 and configure it in order to get it setup correctly. The download link is available here: https://www.sublimetext.com/3
Configure Sublime Text 3.0
After Sublime Text is installed you need to configure it in order to understand Polymer 1.0 and in order to being able to run Polymer using GULP.
Step #01 – Sublime Package Manager
Sublime provides an integrated console where you can run Sublime commands. You can open the console using two different techniques:
CTRL + Menu > View > Show Console
When the console is open, copy the script that will enable package manager, which is available here.
Step #02 – Install Sublime Plugins
Sublime comes out of the box with almost anything but in order to create a proper development environment for Polymer 1.0 we need some plugins:
Tip: CTRL + SHIFT + P will open “Package Manager”

Below is a list of plugins that I personally believe you should have installed in order to be able to work with Polymer
Autoprefixer
If you want a quick way to add vendor prefixes to your CSS, you can do so with this handy plugin.
Emmet
Add some useful keyboard shortcuts and snippets to your text editor.
HTML-CSS-JS Prettify
This extension gives you a command to format your HTML, CSS and JS. You can even prettify your files whenever your save a file.
Git Gutter
Add a marker in the gutter wherever there is a change made to a file.
Gutter Color

Gutter Color shows you a small color sample next to your CSS.
Step #03 – Create a new Project
Finally, we need to create a Sublime Text project in order to keep all our files in a good structure. First of all you need a folder, in my case I work in C:\DEV and in this case I am going to have a project folder called C:\DEV\Polymer_First where I will save my project structure.
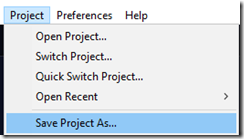
Open Sublime Text and point to the menu > Project > Save Project As:
This will create the new project with an extension of .sublime-project. Then go again into View Menu and choose Sidebar or simply press CTRL + K, CTRL + B.
Initialize Polymer
Now we can finally initialize our Polymer project.
Click on Project > Add Folder to Project and choose your root folder so that your workspace and project structure are pointing to your root project.
Open your SHELL or Command Prompt or TERMINAL and point to your Sublime Text root path, which is in my case C:\DEV\Polymer_First and type bower init:

Then download the basic setup for polymer using:
$bower install --save Polymer/polymer#^1.2.0bower
$install --save PolymerElements/iron-elements
$bower install --save PolymerElements/paper-elements
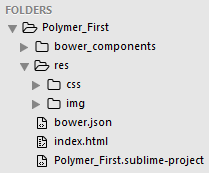
At the end you should have this structure which includes the first .html filder (Index.html):
Final step, which is the one I love most, is to install Sublime Server, which is nothing more than a very simple Phyton local webserver.
CTRL + P > Install Package > Sublime Server
And voila’, now you can right click an .HTML file inside your Sublime Text editor and choose “View in Browser” which is by default <http://localhost:8080>.
Final Note
This is just an overview of how to setup Sublime Text but if you come from a complex IDE like Visual Studio or IntelliJ I would kindly suggest you to spend some time on Sublime and download all plugins that will make your life much easier. There are tons of useful plugins for web development and some specific for Polymer like the following: